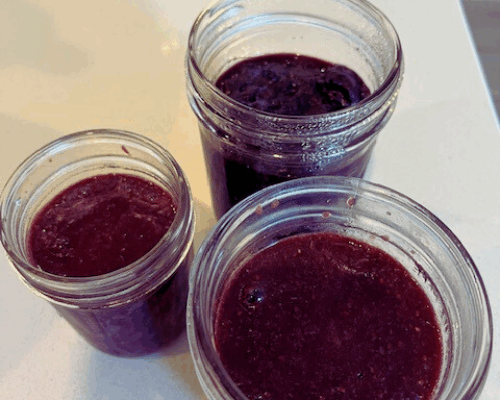


Here’s my recipe for homemade coconut yogurt that uses homemade coconut milk! Yum!!
I’ve taken a deep dive into yogurt making since I’m currently doing the Specific Carbohydrate Diet (SCD). Yogurt is very healing for the gut and I’ve found a probiotic that is helping support my gut recovery after being chronically ill for so long.
This recipe conforms to the SCD and the GAPS diets because the yogurt can be cultured for 24 hours. Though honey is added to the recipe, it is used up by the yogurt cultures during the culturing process. So technically this is considered plain or unsweetened yogurt.
Often yogurt is not tolerated by people with histamine intolerance, so this recipe isn’t for everyone. But if you can tolerate coconut milk and yogurt you can give this recipe a try. Start with a very small amount to determine if your body tolerates it.
As an Amazon Associate, I earn from qualifying purchases.
Table of Contents
Ingredient notes for homemade coconut yogurt
For this recipe, you use organic, unsweetened, dried coconut flakes and water to make coconut milk in a high-speed blender and a nut milk bag. I like this brand of coconut flakes. The reason for using coconut flakes to make homemade coconut milk rather than just opening a can is that canned coconut milk is notoriously contaminated with plastic. All canned food cans have a layer of plastic to keep the food from reacting to the metal. Even cans that are labeled “BPA free” have plastics; it just means that the manufacturer used a different form of plastic containing BPS. See this post for more info on unsafe plastics. Tetra-packs contain a layer of plastic, too. The fat in coconut milk—coconut oil—quickly binds to the plastic molecules in its packaging. So, I’m trying to avoid plastics altogether by making coconut milk at home, preferably in a metal (not plastic!) blender cup. VitaMix, Waring, and Omega are all brands that make stainless steel blender containers.
When you make yogurt, the magic happens when you add probiotic cultures, which convert the milk to yogurt. There are several ways to do this. You can purchase a yogurt starter like this vegan one. You can add a capsule of your favorite allergen-friendly probiotic. Or you can add some ready-made yogurt.
Biotiquest makes my favorite probiotics. I’m not an affiliate, so I don’t make anything if you purchase from them. I use two of their probiotics for making yogurt: Sugar Shift and Simple Slumber. To use these probiotics in yogurt making, you add a couple of capsules of the probiotic powder to the coconut milk to start the yogurt culturing. These probiotics are tailored for specific gut issues. You can learn more about gut dysfunction and healing your gut with beneficial probiotics from the book SuperGut.
Coconut differs from dairy milk in the fat and sugar content, so you need to add a sweetener of some kind (honey or sugar, which the microbes will eat), and a thickener. Commercial vegan yogurts often use gums, which many people with MCAS can’t tolerate. Coconut milk yogurt doesn’t firm up like dairy yogurt, so this recipe also calls for gelatin or tapioca starch to help it set. So, technically, this recipe isn’t vegan if you use gelatin and honey. To make it vegan, you can use sugar instead of honey, and a vegan thickener like tapioca starch instead of gelatin. Using tapioca starch during culturing also ensures that beneficial microbes have sufficient food.
Who is Betsy Leighton?
I’m a writer, blogger, and healer dedicated to helping individuals reconnect with their innate peace and wholeness by healing nervous system dysregulation. My personal experience with chronic illness called Mast Cell Activation Syndrome (MCAS) shapes my work, and my content offers tools to empower those with chronic illness to improve their well-being and take charge of their health.
I created the Sacred Self-Healing Method and am a trained and certified Safe and Sound Protocol provider, an author, blogger, and A Course in Miracles Teacher. I hold a Master of Divinity in Spiritual Counseling and am a trained spiritual mentor, with certificates in sound healing, aromatherapy, nutrition, and Sacred Deathcare. I offer a self-study certificate program in the Sacred Self-Healing Method, provide spiritual counseling and coaching, courses, and supported subscriptions for the Safe and Sound Protocol.
What is MCAS?
Mast Cell Activation Syndrome (MCAS) is a chronic condition that affects all organ systems. It can cause severe, disabling symptoms every day, including potentially fatal anaphylaxis.
The common triggers for MCAS are infections, toxic exposures including mold exposure and EMFs, trauma, concussions, and stress.
MCAS often occurs with other chronic conditions like Ehlers-Danlos Syndrome (EDS) and Postural Orthostatic Tachycardia Syndrome (POTS). Managing MCAS is challenging because many healthcare providers are unaware of it, and diagnostic tests can be unreliable. Treatments include antihistamines and mast cell stabilizers in the form of medications and supplements, along with avoiding triggers. Check out this post on managing MCAS.
Why this recipe?
This recipe is lower in histamine and histamine-releasing foods, refined-sugar-free, and gluten-free. Eating a diet lower in inflammatory foods can help to control histamine intolerance. To learn more about the lower histamine diet, click here!
Make this recipe work for you
Omit any ingredients you don’t tolerate. Taking one capsule of Healthy Gut Holozyme helps your body to digest your food. Choose side dishes based on your dietary needs. If you have histamine intolerance or MCAS, freeze leftovers right away in individual servings to limit histamine production. Freeze individual servings in glass containers for up to 3 months.
The bucket theory
The bucket theory simplifies understanding symptom reactions with MCAS. Imagine your body as an empty bucket you don’t want to overflow. Reactions to various stimuli fill the histamine bucket at different rates, forming the total histamine level (how full your bucket is). More histamine means more symptoms. By managing triggers, reducing exposures, and taking medications and supplements, you can control your bucket’s level.
Know your typical symptom progression
Understanding your symptom progression during a flare is key to developing your rescue plan. This post discusses how to recognize symptom progression so you can be prepared to address them.
Get my free ebook, symptom log, and meal plan!
Want a tool to easily track your symptoms?
Some tips for making yogurt at home
- When you make yogurt, it’s important to control the culture, so you grow the desired beneficial microbes in your yogurt rather than random microbes from the environment. For this reason, it is a good idea to sterilize the jars you are using right before use. One quick and easy way to sterilize jars is to wash them thoroughly before sterilization. Then wet the glass jars and cook on high for 60 seconds in the microwave. Allow the jars to dry on a clean towel. Metal lids can be sterilized by boiling for 10 minutes and then leaving them to dry on a clean towel. You can find other sterilization methods online if you don’t have a microwave.
- Depending on the type of starter culture you are using, there are different ways to make yogurt. There are two types of cultures: thermophilic, which need heat to grow, and mesophilic, which thrive at moderate temperatures, such as room temperature. BiotiQuest cultures are mesophilic, so technically, you could culture them on your kitchen counter without a heat source. But I’ve read that they grow best at human body temperature, so I use a heat source to keep them around 98 degrees Fahrenheit. For this recipe, I provide instructions for using a yogurt maker, an Instant Pot with a yogurt setting, or a sous vide stick as the heat source. No matter which method, you should use glass containers to culture the yogurt in, as stainless steel can leach metals from the acid content in the yogurt.
- For this recipe, you need to use pasteurized honey because raw honey naturally contains bacteria that can compete with your yogurt cultures.
- This yogurt is cultured for 12 hours, so plan and make sure you will be available when it’s done!
Here’s the recipe for homemade coconut yogurt
Ingredients
Equipment
Method
- Place the coconut flakes and water in the container of a high-speed blender, such as Vitamix. Cap it tightly and blend on high speed for 45-60 seconds, until the mixture is smooth and uniformly white. Alternatively, you can use a nut milk machine.
- Fit your nut milk bag into a strainer over a medium glass bowl and pour the coconut mixture into the nut milk bag. Allow the liquid to drain into the bowl and gently squeeze the pulp to extract most of the liquid. Discard the coconut pulp and save the liquid for making the yogurt.
- Stir the honey into the coconut milk and if you are using tapioca starch as your thickener you can add it now. Heat the mixture to 190 °F in the microwave or a pot over the stove. Once it reaches 190 °F place the milk in the freezer to cool down to 100 °F while you prepare the heat source.
- If you are using a sous vide stick, clip it to a large stock pot and add tap water to the minimum water level indicator on the stick. Set the unit to preheat to 98 °F, and set the timer for 12.5 hours (to include heat-up time). Sterilize your jars.
- If you are using an Instant Pot, add about two inches of tap water to the pot. Set the timer for 12.5 hours (to include heat-up time). Sterilize your jars.
- If you are using a yogurt maker, sterilize the glass container and follow the instructions for preparing your yogurt maker.
- Once the coconut milk has cooled to 100 °F, put about ½ cup of the milk into each of the two-quart mason jars (or the yogurt machine container). Add your chosen yogurt starter (probiotic capsule, prepared yogurt, or freeze-dried starter) to the coconut milk in each jar and stir with a non-reactive spoon (wooden or silicone) to combine. Then divide the remaining coconut milk between the jars and give it another stir.
- Loosely cap the jars with the mason jar lids, plastic wrap, or the lid from your yogurt maker. Follow the instructions that come with your yogurt maker for what to do next, and set the timer for 12 hours.
- If you are using an Instant Pot, gently place the uncovered jars into the Instant Pot so you don't get water from the pot into the jars. Loosely cap the jars. Place the cover on the Instant Pot, press the "Yogurt" button, and adjust the time with the "+" or "-" buttons until you reach 12 hours.
- Once the 12 hours is up, remove the yogurt from the yogurt maker / InstantPot / sous vide bath. Dry the jars and then pour all of the yogurt into a blender along with the gelatin. Blend for about 30 seconds, then pour the yogurt back into the jars. Loosely cap the jars again and place the yogurt in the refrigerator to cool and thicken for several hours.
- There may be some separation of the liquid and yogurt as it chills. You can simply mix it back together with a spoon. Serve within five days or freeze immediately.
Tried this recipe?
Let us know how it was!What to serve along with this recipe
You can serve this homemade coconut yogurt with gluten-free SCD granola and tolerated fruit for a yogurt parfait, drain it over cheesecloth overnight to make yogurt cheese, or use it in recipes.
Leftovers
Leftovers keep in the fridge for up to 5 days, but if you have histamine intolerance or MCAS you will want to freeze leftovers right away to make frozen yogurt. You can also strain this yogurt through cheesecloth overnight to make yogurt cheese.
Check out these circadian health tools!
I’m an affiliate with Bon Charge, a company that makes tools for circadian health, and you can receive 15% off your order with my coupon code BETSYL.
Bon Charge offers tools such as yellow– and red-tone blue-blocking glasses, red light therapy devices, PEMF mats, infrared saunas, and EMF-blocking products.
Sign up for the SSP!
I’ve found the Safe and Sound Protocol (SSP) to be the most helpful bottom-up healing strategy if your nervous system has been overloaded with toxic exposures, including mold or non-native EMFs, chronic infections, concussions, stress, or trauma. The SSP is a passive listening therapy that helps heal nervous system dysregulation. Many people with MCAS and other chronic conditions have nervous system dysregulation stemming from infections, toxic exposures, concussions, and trauma. The SSP is an easy-to-use app that lets you listen to specially filtered music for 30 minutes each day as part of a 5-hour cycle. Studies show the SSP has a profound effect on mental health and chronic conditions. Here’s a short podcast describing the Safe and Sound Protocol.
You can sign up for the SSP here!
Heal your mind!
While the SSP is a bottom-up, somatic therapy for healing the nervous system, the Sacred Self-Healing Method I offer is a top-down nervous system-healing modality that focuses on cognition, attention, perception, and emotion, using the mind’s higher functions. The SSP and the Sacred Self-Healing Method complement each other and together produce lasting results. Here’s a short podcast on my self-healing practice.
I provide one-on-one in-person and remote chronic illness and caregiver coaching, as well as Sacred Self-Healing Sessions based on the Sacred Self-Healing Method, a proven, novel co-creative healing modality detailed in my Books.
Order my books!
Here’s a short podcast highlighting my five books.
My latest book, Living In The Light: Healing with Forgiveness, Sound, and Light, is all about the tools that have been most helpful for me to heal: forgiveness, sound, through nervous system retraining using the Safe and Sound Protocol, and light, through entraining my circadian rhythm with the energy of the sun. Living In The Light is available here!
Rocks and Roots chronicles my solo backpacking journey on the Superior Hiking Trail and my efforts to overcome nervous system dysregulation, gut dysbiosis, and Mast Cell Activation Syndrome symptoms to complete the 328-mile hike successfully.
The Sacred Self-Healing Method ebook is available here and in most ebook retailers!
The Sacred Self-Healing Workbook is available for purchase here!
Betsy’s first book, Sacred Self-Healing: Finding Peace Through Forgiveness, is available here
Companion Recordings
The companion audio recordings of chants, guided meditations, and sound healing demonstrations that accompany the Sacred Self-Healing Method are available for free on my YouTube channel here
What do you think?
I’d love to have your reply below!
Disclaimer
The preceding material does not constitute medical advice. This information is for information purposes only and is not intended to be a substitute for professional medical advice, diagnosis, cure, or treatment.